Thursday, September 30, 2010

Caramelized Scallops with a Balsamic Reduction Sauce


"If you're afraid of butter, use cream."- Julia Child

If you haven't noticed by now, I have a strong affinity for scallops. There's something indulgent about biting into those meaty, delectable rounds. Grilled on the BBQ, pan-seared, or even served raw in sushi...the list is endless and there's no wrong method in my opinion. For dinner this week, I decided to make Carmelized Scallops with a Balsamic Reduction Sauce served with roasted carrots and wild rice. It only took about 20 minutes to make and was scrumptious! So tasty that Mr. S. even offered to do clean-up solo.

Prep Tips:

1. Drain your scallops.

2. Place several papertowels on a plate, place the scallops in one layer on the plate. Cover with several papertowels. Place an inverted plate on top and push down hard, squeezing the liquid out.

3. Remove top layer of papertowels. Replace with fresh, dry papertowels. Repeat squeezing process.

4. Salt and pepper scallops on both sides.


Caramelized Scallops with a Balsamic Reduction Sauce

Ingredients:

For the Sauce:

½ cup good quality balsamic vinegar
1 tbsp unsalted butter

For the Scallops:

1 lb scallops
salt and fresh ground pepper
1 tbsp clarified butter
fresh basil or parsley
a pinch of sugar (optional)

Instructions:

1. In a saucepan, heat the balsamic vinegar over medium high heat until reduced by half. 

2. Add unsalted butter and stir gently. Set sauce aside (the sauce will thicken somewhat as it cools down).

3. Prepare the scallops (see above prep note). 

4. Heat ½ of the clarified butter in a a cast iron skillet over medium-high heat until the butter's edge begins to brown slightly. 

5. Place ½ of the scallops in the pan and let them cook for 2 minutes (space them out so they are not touching).  Don’t move, stir or otherwise disturb them during this time as you want them to develop a nice, toasty carmelized crust.  (As the "bottom" is cooking, sometimes I like to sprinkle a teeny, tiny bit of sugar on the scallop. When flipped over to cook the "top," the sugar crystalizes and makes an even crunchier crust.)

6. Gently turn them over with tongs or a spatula and continue to cook for another 1 – 2 minutes. 

7. Transfer scallops to a warm plate. Cover with foil. Repeat with the remaining scallops.

8. Spoon sauce onto plates, top with scallops, and sprinkle with fresh chopped basil or parsley. Voila!


Roasted Carrots

Ingredients:

6 large carrots

2 tablespoons good olive oil

Kosher salt and fresh ground pepper, to taste

1 tablespoons minced parsley

 
Instructions

1. Preheat the oven to 400 degrees F.

2. Slice the carrots diagonally in 1 1/2-inch-thick slices. (The carrots will shrink while cooking so make the slices big.)

3. Toss them in a bowl with the olive oil, salt, and pepper.

4. Transfer to a sheet pan. Spread them out in 1 layer and roast in the oven for 20-25 minutes, until browned and tender.

4. Sprinkle with parsley, season to taste. Serve immediately.


Pancakes as Big as Your Head & Omelettes as Big as Your Purse : Jim Denny's

816 12th Street, Sacramento, CA , 95814. (916) 443-9655

A few months ago, on a sleepy Saturday morning Mr. S. and I decided to check out Jim-Denny's, a Sac-town breakfast institution (it was founded in the mid 30's and moved to it's current location after WWII). Jim-Denny's is everything you can hope for in a dive; it's tiny, it's cluttered and it smells like bacon. There's only a few counters seats (heck, there's only a few seats in the whole place) and we lucked out to arrive just as a friend of mine happened to be finishing up and leaving. Having nabbed our seats, we perused the menu. Man, everything sounded amazing! My barstool neighbor to the right was a Jim-Denny's regular and was giving all kinds of helpful suggestions which made deciding which dish to go with even more difficult. I ended up going with an omelette with sausage, spinach, onions and bacon ($9). We got to watch as the cook poured a monsterous amount of food on the grease caked grill and wrangle it back and forth until it began to morph into a mouthwatering omelette. Plated, the omelette was HUGE and came with a heap of potatoes and a side of toast. It was delicious but I could only make it through about half before my stomach wimped out on me. What's crazy is that, there's an even BIGGER omelette offered called The Works ($11)! A gutbuster that includes 9 fillings, 2 cheeses and 3 eggs...Lordy! Mr. S. and I had a kickass time grubbing down with our countermates and chatting with the staff (thanks for the Thai restaurant rec!). Although we did have to pause a moment when we noticed a petite little granny a couple of seats down order a pancake the size of a hubcap (and in case you're wondering-- she scarfed  ALL of it down and a few other dishes as well-- go, granny, go!).

Anyhow while we were eating, a polite young man with a video camera came in and asked us if we would be okay with him filming everyone eating at the counter. We found out later they were filming an episode of Man Vs. Food (a Travel Channel show). We had walked past the crew in the parking lot without realizing what was going on. A friend of mine forwarded two stills from last night's episode. I posted them below. I look pretty horrible, but what a great meal!


Tuesday, September 28, 2010

'Murphy's Law' Chocolate Chip Cookies


Have you ever started a project, only to find out midway through that you lack the proper tools or ingredients and that your mind's going in 20 million different directions? Yesterday was like that for me. I was super exhausted and having an unbelievable jones for some chocolate. In all my bright wisdom, I decided to start a batch of chocolate chip cookies without checking first to see if I had everything I needed (completely unlike me). After I mixed the "wet" ingredients in with the "dry" goods I noticed that the batter wasn't smoothing out and it looked drier than the Sahara. A few more flicks of the spoon and the light bulb went on above my head. I realized I had completely omitted the butter! Not having any butter ready at room temperature, I unwrapped two sticks of butter, popped them in some Pyrex and microwaved them at 2 minutes. What I got was a Pyrex measuring cup full of liquidy butter. At this point there was no turning back, I poured the goop into the bowl and stirred...and stirred. Surprisingly, it was looking pretty good. Time to add the chips. Turned out I only had half a bag of chips in the freezer, so I compensated by throwing in a handful of slivered almonds. At this point, I'm sure all my baking savvy friends are slapping their face "Home Alone" style and are trying to contain how appalled they are; but I'll be honest, despite all the issues the cookies turned out phe-nomenal! Probably one of the best batches I've ever made. Who'd have thought?

Here's the link to the original cookie recipe: Toll House Cookies

Here's my version:

Murphy's Law Chocolate Chip Cookies

Ingredients

2 1/4 cups all-purpose flour

1 teaspoon baking soda

1 teaspoon salt

1 cup (2 sticks) sweet cream butter

3/4 cup granulated sugar

3/4 cup packed brown sugar

1 teaspoon vanilla extract

2 large eggs

1 cup semi-sweet chocolate morsels

3/4 cup sliced almonds


Instructions

1. Preheat oven to 375° F.
 

2. Combine flour, baking soda and salt in small bowl. 

3. Beat granulated sugar, brown sugar, vanilla extract and eggs in large mixer bowl until creamy. 

4. Place two sticks of butter in a microwave-safe container. Microwave for 2 minutes.

5. Gradually beat in flour mixture.

6. Pour butter into bowl and mix throughly with other ingredients.

7. Stir in morsels and nuts. 

8. Drop by rounded tablespoon onto baking sheets sprayed with PAM.
 

9. Bake for 9 to 11 minutes or until golden brown ( I went 12 minutes in my oven). 

10. Cool on baking sheets for 2 minutes; use a spatula to remove.

Monday, September 27, 2010

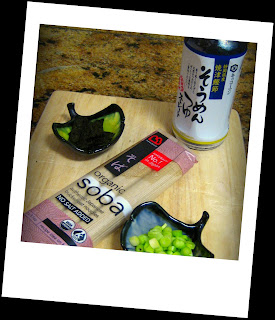
Tsuru - Tsuru : Zaru Soba


The Japanese have a term for the slurping noise one makes when savoring a noodle dish, it’s called, “tsuru-tsuru.” Making slurping noises is recognized to be a good thing and encouraged in Japanese culture. It’s considered a way to convey your appreciation of the meal to your host. In Japan, noodles symbolize “longevity,” and are eaten quite a bit. In addition, they’re eaten on New Year Eve to symbolize the passing of the old year and beginning of the new year (called toshikoshi).

One of my favorite Japanese noodle dishes is zaru soba (which means “basket” noodle). Zaru soba consists of cold buckwheat noodles served with a mild dipping sauce (tsuyu) and various garnishes (yakumi). It’s a refreshing, classic summer dish that cools you down quickly on a hot day and takes minimal effort to prepare. You can make your own tsuyu (from dashi stock, mirin and soy sauce) but I prefer to keep a bottled of premade tsuyu in my fridge. You can buy the premade tsuyus in concentrated and unconcentrated versions; if you buy the concentrated version, be sure to dilute the base before using it.


Ingredients

1 bottle of chilled soba tsuyu (somen tsuyu works too)

9.5 oz. package of soba noodles

Your choice of condiments:

Thinly sliced green onions

Toasted sesame seeds

Nori ( dried seaweed), cut into matchstick sized strips

Grated ginger

Grated wasabi

Chopped shiso  (perilla)


Instructions

1. Bring a pot of water to boil. (Do not salt the water.)

2. Once water is boiling, place the dry noodles gently into the pot.

3. Stir gently with chopsticks to separate the noodles so that they do not clump and to make sure they are all fully immersed.

4. Bring the water back to a boil then set it to simmer.

5. Check your noodle package for how long to cook your noodles; the time varies according to brand. On average, it’s usually about 4-7 minutes.

6. Test a strand. It should be firm yet tender.

7. Remove the pot from the stove and transfer the noodles to a colander. Drain the hot water.

8. Place the noodles under a steady stream of cold water to stop the cooking process and wash the starch off. (Don’t skip this step, it does have an impact on the taste of the noodles.)

9. Use your fingers to swish around the noodles and wash them well.

10. Drain. Then place a small bundle of noodles on a bamboo mat, tray or flat sieve. I have small, plastic “colander/basket bowls” that I like to use. This allows excess water to drain away.

11. Pour one cup of tsuyu per person for dipping.

12. Place a small amount of noodles in tsuyu, garnish with whichever condiments you prefer and finally…sluuuurp!

13. Repeat until satiated.

Thursday, September 23, 2010

Ambience


6440 Fair Oaks Blvd., Carmichael, CA 95608. (916) 489-8464

There are several “great” places to eat in Sacramento. Likewise, there are several “romantic” places to eat in Sacramento. But unfortunately, there are very few great, romantic places to eat in our town. So when a friend mentioned Ambience I was a bit skeptical, especially since it seemed to be located smack dab in the middle of the ‘burbs in a (gulp!) strip-mall. Yes, you heard me correctly—a high end, romantic restaurant in a suburban strip-mall. This I had to see. So back around Christmas time, when Mr. S. and I decided to embark on a little kidlet-free staycation; we booked a table for deux at Ambience and a night at the Citizen.

I’ll just skip the suspense and let you know that my first experience at Ambience was phenomenal. Our server, Shaznod, proved that customer service is not dead and the food…man, oh man, I still dream about their lobster bisque! Now, I bet you’re wondering why it took me so long to write up a review of Ambience…wellllll, I’ll be honest, I’ve been touting the restaurant to all my close friends (and even a few strangers. Guy in the supermarket line, it was a pleasure chatting with you!) but before I wrote it up, I wanted to give it one more whirl to make sure that my exemplary experience there was not a delusion. So, I booked a table for a quiet Thursday night and talked two of my food-loving friends into trekking back out there with me. Amazingly, both the food and service were spot on again. So, it was time to get writing….

Ambience is located on Fair Oaks Boulevard in a stand-alone building surrounded by a non-descript strip mall. The interior décor is a bit minimalistic. There is wood flooring throughout and two rooms with damask covered booths and white table cloths. Also, small lights are interspersed through the dining area in an attempt to give the dining room a dark, intimate vibe. In my opinion, some simple pieces of artwork would soften the stark walls and add some overall warmth. Oddly enough, both times I visited the establishment there was only a handful of patrons and the adjacent rooms (where the non-booth tables were) were closed off to seating. Service from start to finish was impeccable. I love the fact that the staff is exceptionally knowledgeable about the various wines offered and versed in the dishes that are put out.

Please note, Ambience offers a prix fixe menu only. It’s a five course dinner for a flat $45 (tax and tip not included). There are 1-2 choices offered for the first course, 5 choices for the second, 1 (a soup) for the third, 5-6 choices (entrée) for the fourth and 4 choices (dessert) for the fifth. You get plenty of options but if you’re the high-maintenance type that likes to modify everything you eat, this probably isn’t the place for you. In addition, most of the entrées feature game meat of some sort; so, if you’re adhering to a vegetarian diet, I would not suggest visiting Ambience.

On my first visit, the dinner began with a spinach and gorgonzola cream gratin with Oaxaca cheese served in a mini-cocotte. It was delicious but really needed to be served with some bread or some other accompaniment that it could be spread upon.

For the second course, I opted for the foie gras on crisp, truffle oil crostini served with a sliced cinnamon burgundy poached pear, an asian pear puree and a sweet shallot chutney. Mmmm! Each bite was pure bliss!

For the third course, we were presented with a small bite of succulent seared lobster, surrounded by a pool of creamy lobster bisque and garnished with crème fraiche. Oh-my-god, I think my eyes rolled back into my head and my toes curled when the spoon hit my lips.

I think right about this time, Mr. S. commented about how although the portion size of the three courses we had ingested so far had appeared petite, he was getting a bit full. He was right, between eating “heavy” dishes and our waiter actually spacing our courses out in the proper manner so we could enjoy each dish fully; I too, was getting somewhat full and was eating a bit slower.

For my entrée, I decided upon the boneless, young New Zealand rib-eye of lamb coupled with a yam-potato puree and a stuffed tomato and apricot-mint glaze. The plating was exquisite and the dish itself was quite tasty; however, I actually preferred Mr. S.’s seared elk steak to my own entrée. The black wild rice his dish was served with imparted a deep, chocolaty aftertaste and the sautéed chard offered a nice contrast to the herb balsamic sauce drizzled upon the tender elk.

For dessert, we ordered the apricot-mango brûlée with fresh berries and the chocolate mousse and mousse cake duo. Both desserts were really rich and satiated my sweet tooth. Although by the time we reached our fifth course, we couldn’t manage more than a bite or two.

For my second visit, my dining companion ordered us a bottle of the Sobon Estate’s 2006 “Rezerve” Zinfandel. It was a decent wine; full-bodied and heavily laden with sweet fruit undertones. It had a dry finish and would have probably been a better match for a meat dish (I had a fish dish as my entrée.)

For my starter, I elected to go with figs stuffed with goat cheese and melted with an apricot balsamic glaze. Much to my dismay, the server informed our table that although the dish was still being offered; they were unfortunately out of apricots for the evening. The figs arrived (sans apricots) with a simple balsamic glaze and were warm and delectable; however, the goat cheese was mysteriously MIA.

Second course, same as the first! (Just kidding! The Herman’s Hermits’ tune, “Henry the VIII, I Am,” popped into my head for some reason). For round two, I selected the Hawaiian ahi tuna trio served with tomato-ginger coulis, cilantro oil, pine nuts and a spicy green tobiko. The fish was fresh tasting and was a perfect follow up to the heavy figs. In addition, I was also able to wangle a taste of my dining companion’s beef tartar (topped with quail egg and truffle oil vinaigrette). The beef had a great texture to it and seemed to melt in my mouth.

Next, all three of us were served an asparagus purée as a palate cleanser. The purée was nice and light and garnished with a touch of crème fraiche; but I was a bit disappointed that they weren’t still serving the heavenly lobster bisque from my previous visit. Yes, I may have even pouted a little….

For my main course, I went with the grilled orange roughy on dill potato gnocchi and organic white corn kernels; garnished with cherry tomatoes, dill butter and white wine lemon sauce. The fish was cooked to perfection and I enjoyed the mélange of flavors on the plate.

Last but definitely not least, I closed out my culinary adventure with a superb Baked Alaska. They didn’t do the theatrics of a flambé at the table but the dessert still receives top marks in my book. I’m not really keen on decadent desserts (I’m more of a savory girl) but I ate every bite of the scrumptious meringue and creamy ice cream that night and had sweet dreams.

To sum it up, Ambience exudes a quiet, elegance that’s hard to find in most Sacramento restaurants. It focuses on perfecting the chief components of an amazing restaurant: atmosphere, courteous and attentive service, good value and impressive, flavorful food. Check, check, check and…check! Despite the location being less than desirable (I wish it was in the grid), we’ll definitely be returning to Ambience for future nights out on the town. Hope to see you there!

Sunday, September 19, 2010

Cornmeal Blini with Smoked Trout and Crème Fraîche


Who doesn't like appetizers? They're cute, they're tasty and you can pop them in your mouth in one bite. No muss, no fuss. About a year and a half ago, I had this great cornmeal blini appetizer at a cooking/dinner party. The host had taken a recipe from Chow and substituted the caviar with smoked fish. The miniature-sized apps were delectable and I filed the recipe away in my "to make" file. Yesterday, Mr. S. and I attended a BBQ at his cousin's house and I decided to try my hand at them. Well, making teeny, tiny "pancakes" is actually harder than it looks. After the first half dozen or so, I gave up trying to achieve a perfect circle and settled for a haphazard oblong shape...hey, it all tastes the same, right? :)

Cornmeal Blini with Smoked Trout and Crème Fraîche

Ingredients

1/2 cup cornmeal

1/2 cup all-purpose flour

1 teaspoon baking soda

1/2 teaspoon kosher salt

1 large egg, lightly beaten

1 cup milk

Vegetable oil for frying

1.5 cups crème fraîche

1/4 lb. smoked trout (I used applewood smoked Steelhead Trout purchased at Taylor's Market)

1 bunch chives, finely chopped


Instructions

1. Heat oven to 250°F.

2. In a medium bowl, combine cornmeal, flour, baking soda, and salt and stir well to mix. Add egg and milk, and mix until smooth.

3. Heat a heavy griddle or frying pan over medium heat until hot, then brush or mist with oil. Using a spoon and working in small batches, drop tablespoons of batter into the pan. When bubbles form evenly on the top of the blini, flip over and cook until golden.

4. Transfer the first batch of cooked blini to a heatproof plate lined with paper towels and keep warm, covered, in the oven. Repeat with remaining batter.

5. To serve, top each warm blini with 1 tablespoon crème fraîche, a tablespoon of smoked trout and a pinch of chives. Serve immediately.
 
(Adapted from Chow.com's Cornmeal Blini with Caviar recipe.)

Thursday, September 16, 2010

B*tchin' Shrimp : Basil Lime Shrimp

"You don't have to cook fancy or complicated masterpieces- just good food from fresh ingredients."
- Julia Child


I've been cooking this recipe from Bitchin' Camaro since April and I'm not sick of it yet (it appears neither is Mr. S., since we had it again this week and all of it was happily consumed). Since I've recommended it to several friends now, I figured I should post it. This is great for a night when you're pooped from work and want something simple to throw together. The shrimp are cooked in a flash (you barely have to do any stove time) and it's ooooooh so yummy! Also, it's not very spicy (more on the tangy side, in my opinion) so even kidlets can enjoy it. The original recipe says to serve it up with some baked plantains but we prefer it with rice or some stir-fried fresh veggies.


Basil Lime Shrimp

Ingredients

2-3 tbsp. olive oil

1 lb. large shrimp, peeled, de-veined and tail-off

1 1/2 tsp. Thai red curry paste

1/3 cup vegetable stock

juice of 2 limes

3 tbsp. chopped basil leaves

salt to taste


Instructions

1. Heat a large skillet over medium heat with the olive oil.

2. Whisk the curry paste, stock and lime juice together in a small bowl and set aside.

3. When the skillet is hot, add the shrimp, stirring constantly to ensure they cook evenly on all sides and don’t stick to the pan. Make sure not to overcook the shrimp or they’ll lose their tenderness. Three to 5 minutes should do it.

4. Once they’re cooked, remove from heat and toss with the curry lime sauce and the basil.

5. Taste and add salt if needed.

Unwrapped : Enoki Packets


This recipe involves very little effort, quick clean-up (who doesn't love that) and results in a sweet, earthy tasting side dish. If you're not familiar with Enoki mushrooms; they are long, thin, bone-colored and delicate in flavor. They are often used in Japanese recipes and are known to be high in niacin, iron and potassium.  I often toss some in some sukiyaki or simply wrap them in bacon and roast them in the oven.

Enoki Packets

(serves 2)

Ingredients

1 package of Enoki mushrooms (you can find these at Oto's, most Asian markets and the Raley's on Freeport often carries them...buy the fresh stuff not the canned or jarred)

1/3 cup mirin

1/3 cup soy sauce (I prefer Kikkoman Lite Soy Sauce for this recipe, it's not as salty tasting)

1/3 cup water

2 T unsalted butter


Instructions

1. Hold Enoki bundle together, cut off and discard the roots. Wash under running water for several minutes. Place on a papertowel and pat dry.

2. Mix mirin, soy sauce and water in a bowl.

3. Add mushrooms and allow to marinate for about 5 minutes. (Do not rinse)

4. Remove mushrooms and place on a sheet of aluminum foil.

5. Cut the butter into 4 pats and place them on top of the mushrooms (spaced apart).

6. Fold foil over to make a "packet", seal both ends well.

7. Place in an oven-safe dish (in case of leakage) and pop it in the broiler for 10-12 minutes until enoki are tender.

8. Remove from oven. Unfold packet.  Be careful the contents will be pipin' hot!

Wednesday, September 15, 2010

Have You Checked This Out?

These days, one of my favorite pre-made meals to have on hand is Trader Joe's Pacific Flounder Stuffed With Crab Meat. It can be found in their frozen foods section and runs about $2.99. The fish is tender and there's a decent scoop of crab in the filling. You just need to thaw it and then bake it in the oven for 20-25 minutes...perfect if you're feeling lazy. Tonight, I squeezed some fresh lemon juice on it and served with a simple haricot vert sauté. Surprisingly, the meal was pretty filling.


Zippy Zucchini : Zucchini Pasta


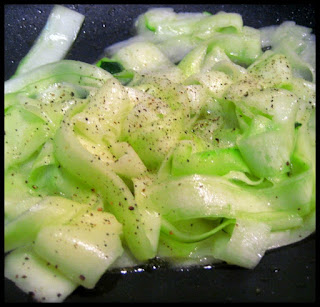
Overrun with zucchini? Trying to eat healthier? Going gluten-free? Try replacing your pasta with zucchini ribbons. Not convinced? Check this out...it takes seconds to make, is very low in calories (one medium sized zucchini only has about 25 calories) and is rich in Vitamin C (also it's good source of vitamin B6, riboflavin and manganese). In addition, this recipe only requires a few ingredients and one pan. Gotta love that! Now, you can top it off with whatever you want (the recipe suggests marinara sauce or Parmesan) but I've found it to be quite tasty with just a few turns of the pepper grinder.

Zucchini Pasta

Ingredients

2 pounds zucchini

2 tablespoons extra virgin olive oil

Kosher salt and freshly ground pepper

3/4 cup fresh tomato sauce (optional)

1/4 cup freshly grated Parmesan, for serving (optional)


Instructions


1. Using a vegetable peeler, cut the zucchini into lengthwise ribbons. Peel off several from one side, then turn the zucchini and peel off more. Continue to turn and peel away ribbons until you get to the seeds at the core of the zucchini. Discard the core.

2. Heat 1 tablespoon of the oil in a large nonstick skillet over medium-high heat. A

3. Add the zucchini ribbons and 1/2 teaspoon kosher salt. Cook, tossing and stirring the zucchini, for two to three minutes, until softened and beginning to turn translucent.

4. Add freshly ground pepper to taste, and transfer to a serving dish.

5. Repeat with the remaining olive oil and zucchini. Serve, topping with tomato sauce and freshly grated Parmesan if desired.

* Serves four. This dish is best served right away.

Original recipe can be found in the New York Times' Recipes for Health section: Zucchini Pasta.

Tuesday, September 14, 2010

A is for Apple


Much to my delight Apple Hill officially opened right after Labor Day. Now if the weather could get just a wee bit more crisp so that it feels more like fall when we go up there. Mmmm...I can't wait to make some apple galette and try my hand at apple butter. Not to mention, sipping on a mugful of hot mulled cider (yum!).

Things to check out:

Epicurious published a nifty little "know your apple varieties" guide today:  A Visual Guide To Apples

Apple Hill also runs their own website that lists the growers, upcoming events and a link to their free Cider Press online mag:   Apple Hill Growers  
Looks like there's a lot of fun activities for kids.

What do you look forward to most at Apple Hill?

Friday, September 10, 2010

Itadakimasu! (Let's Eat!) : Japanese Curry


I'm still on a Japanese comfort food kick at my house and nothing hits the spot on a chilly day like a plateful of fresh karē raisu (カレーライス). Japanese curry rice is sweeter than thai curry and thicker than Indian curry. It's also a dish that entices both adult and childrens' tastebuds. Chocked full of protein and veggies, it's one of the healthier, quick fail-safe dinner dishes you can make too.


Karē Raisu   (Japanese Curry Rice)

Ingredients:

2 large carrots, peeled & sliced into half-rounds
1 large potato, peeled & cubed
1 large yellow onion, diced
2 T cooking oil
2 lbs chicken breast, cut into bite-sized chunks
6 cups of water
1 (8.4 oz.) package of medium-hot S&B Golden Curry Sauce Mix (It's the best brand)

Instructions:

1. Cut the chicken breast into bite-sized chunks.

2. Dice carrots, potato and onion.

3. In a large skillet, heat cooking oil. Then sauté meat and onion in oil until lightly browned, about 3-5 minutes. Add carrots and potato.  Discard excess oil.

4. Add 6 cups of water and bring to a strong boil. Reduce heat, partially cover and simmer until meat (and potato) is tender, about 20 minutes.

5. Break Golden Curry Sauce Mix (roux) into small cubes and add to pot stirring until it is completed dissolved.

6. Simmer for another 5 minutes or so stirring constantly.

7. Serve over freshly cooked white rice. If you want to serve it in the traditional Japanese fashion, top it with a small portion of fukujinzuke for a contrast in taste and color.

Thursday, September 9, 2010

Oka-san's Gyoza


Now that the weather's cooling down, I've been craving Japanese comfort foods like crazy- gyoza, curry rice, omurice and ramen just to name a few. So what better way to celebrate this early autumn weather than to have a gyoza making party? It was a bit chaotic in my small kitchen but I had a great time pinching gyoza wrappers, munching on Japanese snacks and catching up on goings-on with four of my lovely lady friends. Also, just by happenstance everyone had opted to make different types of fillings so there was an array of flavors to choose from come tasting time. For my gyoza attempt, I went with my mom's traditional pork gyoza recipe. They came out great but I still think they taste better when my oka-san (mom) makes them.

Oka-san's Pork Gyoza

Ingredients

2 packages of gyoza wrappers (the round kind)
1 Napa cabbage, de-ribbed and minced
1 lb. ground pork
1 t table salt
1/2 t sugar
2 t sesame oil
1 T freshly grated ginger (use a microplane grater)
2 T green onion (green part only), minced
2 T nira (minced)
5 cloves garlic, finely minced

Instructions

1. Wash, de-rib and mince the cabbage. Place in a colander and sprinkle with salt. Let it sit for about 5-10 minutes.  Firmly squeeze the cabbage to remove any residual water, this keeps the cabbage from becoming soggy during the cooking process.

2. In a large bowl, mix the cabbage, pork, garlic, nira, green onion, ginger, sugar and sesame oil together. Use your hands to really mix it in and work it. Ball it up and throw it against the bowl a few times. This helps to spread the ingredients out and tenderize the meat.

3. At your work station: place a large plate, small bowl of water and a container for the completed gyoza (I used a Pyrex casserole pan).

4. Start with 4 gyoza skins on your plate. Place a tablespoon of filling at the center of each skin. Then wet your index finger and trace the edge of half of the skin. Fold the dry half over the filling, creating a seal.  Pinch the skin in the center and then continue to make pleats down each side or start on one side and work your way across. Don't worry if your first few come out looking like a wolverine chewed on it, it gets easier as it goes.  Here's a great tutorial, if you'd like to perfect your technique.  Gyoza Tutorial

5. Place each completed gyoza in your "done" pan.

6. When complete, you can either freeze them or cook them. If you choose the latter, get a large skillet ready.  Place a teaspoon of oil in the skillet at medium-high heat. Once it's hot, place your gyoza on it (spaced so they're not touching). Cook until the "bottoms" turn brown.

7. Then pour 1/4 cup of water into the skillet (be careful!), cover, lower the heat and allow the gyozas to steam cook.

8. When the water's gone, the skins appear translucent and the meat seems firm, it's done. Remove from the pan and place on a papertowel covered plate.

9. Serve hot with your favorite dipping sauce (mine's : equal parts soy sauce and rice vinegar with a splash of chili oil and sesame oil).

Wednesday, September 8, 2010

We Be Jammin' : Blackberry Freezer Jam


Mmmm, blackberries...I love them. They're sweet, they're tart, they're juicy...they just scream summer. And in August, they're at every supermaket, farmers' market and roadside stall. But like the ant in the "The Grasshopper and the Ant," I needed to start preparing for the colder months when blackberries aren't so plentiful (or cheap). Canning's the logical way to set aside the berries but all that sugar and they'd be a bit mushy...I was in a bit of a quandry. What to do, what to do.... A friend of mine suggested making freezer jam and then luck would have it my local Target had Ball's Instant Fruit Pectin on sale, so I went with that. This stuff is amazing! You can make jam in a few minutes without having to use the stove and you don't even have to sterilize the jars (just wash them well). Not to mention that you use MUCH less sugar, the jam tastes fresher and it has more of a fruit-like texture to it.

If you aren't familiar with freezer jam, check out this great NPR article on it:  Freezer Jam: A Baby Step to Canning

Blackberry Freezer Jam

Ingredients

4 cups of crushed blackberries (I used a potato masher. You can remove the seeds by using a sieve if you wish, but I left mine in)

1.5 cups of sugar ( do not use less/more or substitute another type of sweetener, it's what's needed to make it gel)

5 (8 oz.) containers (you can use freezer jars, (straight-sided) jelly jars, any sealable plastic containers)

1 package of Ball's Instant Fruit Pectin (1.59 oz.)


Instructions

1. Stir sugar and pectin in a bowl.

2. Add crushed fruit and stir well.

3. Ladle jam into clean jars and let it stand for 30 minutes.

4. You either eat it then or freeze it.

5. Freezer jam can be frozen for up to 1 year. Once thawed, it must be kept in the fridge and it's good for up to 3 weeks.

Tuesday, September 7, 2010

Oh Fudge!


Kids are wily. Last week when I dropped by Mr S.'s abode, I should have known something was up when Kidlet #1 greeted me at the door with a big smile and a compliment. He smoothly transitioned into asking me if I knew how to make fudge. When I replied that I did but that it had been several years since I had made pans of that rich, chocolaty treat (I used to make it at Xmas time); I could see his 11 year old brain tickering away...after a moment or two, he hesitantly inquired whether I'd make some. Being that I'd hate to be the one to trample on a child's dream (and he was looking at me with big, blinky eyes) I acquiesced. Plus fudge is one of the easiest desserts to put together, you don't even need to use an oven. So, Kidlet #1 and I struck a bargain-- if he was good for a week, then I'd make some fudge and bring it over. It's a week later now and guess what I was making in the kitchen this morning? I'll give you a clue, Kidlet #1 was as sweet as fudge all week.  :)

Ingredients

1 t of vanilla extract
2/3 cup evaporated milk (not to be confused with sweetened condensed milk)
1.5 sticks of unsalted butter
3 cups of granulated sugar
16 oz. bag of semi-sweet chocolate chips
7 oz. jar of marshmallow cream (do not sub with regular marshmallows)
1/4 cup sliced, roasted almonds

Instructions

1. Line a 13"x9"x2" baking pan with foil. Then spray with cooking spray.

2. In a heavy pot, stir together sugar, butter and evaporated milk. Bring to a rolling boil.

3. Once it reaches a boil, let it go for 4-5 more minutes, stirring constantly.

4. Turn off the heat, stir in chocolate and marshmallow cream.

5. Mix thoroughly. Add the vanilla then stir some more.

6. Pour into the lined pain.

7. Sprinkle liberally with sliced, roasted almonds.

8. Place pan in the fridge to harden.

Monday, September 6, 2010

Heavenly Hummus


You've heard of the Midas Touch, right? Well, my friend Cate has what I like to refer to as the Hummus Touch. She touches plain old garbanzo beans...and "POOF!" they metamorphize  into some mind-blowing, magically delicious hummus. Mr. S.'s eyes glaze over in hummus lust whenever her hummus is mentioned...seriously, it's the best tasting hummus you'll ever have. If you don't believe me, follow this recipe and find out for yourself but don't say I didn't warn you!

Ingredients

3 cups of garbanzo beans (buy dried chickpeas and rehydrate them, they taste so much better than the canned beans...it's worth the hassle.)
1 can of white kidney beans (save the liquid)
1 large lemon
4-6 garlic cloves (pressed)
2-3 T tahini
4-6 T olive oil
Salt and Pepper

Prepping Chickpeas (aka garbanzo beans)

- Place dried chickpeas in a large bowl, pick out any debris or unsavory looking beans.

- Rinse the beans a few times under the tap.

- Place the beans in a large bowl (use a big one because the beans will swell as they absorb the water), cover with plenty of water and leave to soak overnight. You can leave them in the fridge if you wish, but I usually just leave the bowl on the counter.

- The next day, drain the water and place the beans in a pot with clean water.

- Bring the beans to a boil then reduce the heat to low and allow the beans to simmer for about 15 minutes.

- Skim off and discard any foam that appears on the water's surface.

- Remove the pot from heat, drain into a colander and rinse well with cold water.

Hummus Instructions

- Hummus is easiest to make in a food processor, but a blender will also do the trick. However, you might have to halve the recipe to fit (this makes a TON) it in a blender.

- Put beans in blending machine of choice, add pressed garlic, juice of half a lemon, tahini and a little bit of the reserved bean liquid (maybe 2-3 tbls) , enough for it to blend fairly easily, but not so it’s runny. Try adding a little at a time, until it’s running fairly smoothly but there are still little flecks of beans.

- Taste and add more lemon juice, tahini, salt and pepper (to taste).

- When the taste is to your liking, with the machine running pour the olive oil in very slowly in a little stream, this makes the hummus fluff up a bit as the oil is emulsifying the mix and it gives it a nice texture. ( Just make sure you’ve added all the other wet type of ingredients lemon juice, tahini, bean liquid before the oil otherwise it can wind up runny. )

- You can jazz the hummus up by topping it with your favorite accompaniment- a tasty, puree of roasted red peppers, fresh parsley and a drizzle of olive oil or perhaps a sprinkling of za'atar or some cumin and cayenne...the possibilities are endless.

Thursday, September 2, 2010

'Shrooming : Mushroom Soup


According to whomever decides this crap, September has been deemed National Mushroom Month.  Since I didn't want to have the mushroom mafia after me  for not paying proper homage to the almighty fungi, I decided to whip up a batch of pipin' hot mushroom soup.

[Note: If you are looking for a healthy, light soup...this is not the soup for you. It's heavy, decadent and a true "comfort food" dish.]

Mushroom Soup
(* adapted from a recipe in "Comfort Me With Apples" by Ruth Reichl)

Ingredients

1 lb. portobello mushrooms, destemmed & sliced
1 lb. crimini mushrooms, sliced
2 small yellow onions, diced
4 cups beef broth
1/2 cup red wine
2 cups heavy cream (or half and half)
1 cup whole milk
8 T flour
1 t ground nutmeg
1/4 t thyme
2 bay leaves
1 stick of unsalted butter
salt
pepper

Instructions

1. Melt butter over medium heat in a heavy saucepan.
2. When foam subsides, add onion and saute until golden.
3. Add mushrooms and saute until brown.
4. Stir in flour and then slowly whisk in broth.
5. Add seasonings.
6. Heat cream/milk on the stove or in the microwave and slowly add to pot. Whisk again to ensure that everything is incorporated.
7. Add wine. Whisk yet again. (Is your arm getting tired yet?)
8. Simmer on low for ten minutes (do not boil).
9. Taste. Modify seasonings as needed.


Fashion Trend © 2011 | All Rights Reserved | About | Privacy Policy | Contact | Sitemap