I'm not sure about you all but I've been absolutely dying the last few days from allergies. DYIN', I tell ya! I haven't had allergies this bad in at least 5+ years. They were so bad that I had to spend all of yesterday in bed sleeping. I felt like I was enduring some version of 50 Shades of Allergy Hell. I'd occasionally get up to slam some Allegra-D and Sinex or snort some Flonase, but nothing was working. I spent my day sucking on hits of Cepacol Hydra drops like they were all-day suckers and at night...oh, the nights were the worst! I ended up resorting to taking Nyquil (the dreaded green flavor even) so that I could get some relief from the incessant and unladylike hacking, gacking and occasional phlegm-laced vomiting. I was (am) a total mess.
Source: www.nataliedee.com
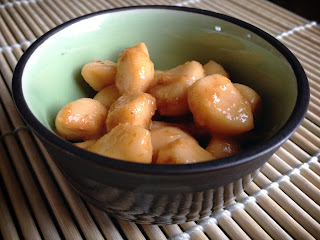
Today's the first real day that I could taste something so I decided to have some rice and ninniku miso-zuke (aka miso-cured garlic). The saltiness of the miso and the tempered bite of the garlic (which is simultaneously sweet and savory) tasted exquisite to my tongue which had been deprived of any flavor the last few days. Ninikku miso-zuke is super easy to make, you just need three basic ingredients: miso, mirin (a sweet rice-wine) and fresh garlic cloves. The hard part is just leaving the batch alone and allowing it to ferment. This summer I might try and be ambitious and try my hand at tofu misozuke, which I've heard people rave about and compare the texture to being like "triple cream blue cheese" or "a cross between butter and foie gras." How delicious does that sound?! I'll keep you posted if I get around to it.
Ninniku Miso-Zuke
Ingredients
handful of fresh garlic cloves
1 cup miso paste- I prefer to use aka (red) miso, but a sweet shiro (white) or barley miso could be used too
1/4 c mirin
1 clean, dry wide-mouth quart jar
Instructions
1. Separate the garlic cloves. Trim the garlic ends, remove the outer skin and also peel off the thin filmy membrane layer.
2. Blanch garlic cloves for 1-2 minutes in unsalted water. Pull them out and pat dry them with a clean paper towel.
3. In a small bowl mix together your mirin and miso thoroughly.
4. Place a thin layer of miso at the bottom of your jar then make alternating layers of miso and garlic cloves. (Note: You don't want the cloves to touch.) Continue the layering process until you run out of ingredients or reach the top. Finish the top with a miso-mirin mixture layer and make sure all the garlic cloves are covered with miso.
5. Latch your jar and place it in the fridge. Allow it to pickle for at least 1 month. The garlic gets better with age. Keeps good up to 3-4 months.
6. When you're ready to eat the garlic, just pull out the amount you want to eat, rinse off the miso and serve. Use as an accompaniment to a meal or just eat them as a snack. I like to shove a few into the middle of my onigiris or dice it up and mix it with butter when I'm sautéing.
* Tip #1: As you clear each layer of garlic, the miso is still good and can be used in your recipes that call for miso.
* Tip #2: You can buy mirin and aka miso at most Asian speciality stores. For Sacramentans: Otos' Market on Freeport Blvd. carries both.
* Tip #3: Take the time to use fresh garlic in this recipe. The pre-peeled garlic that you can buy in bags at Costco and other grocery stores isn't as fresh and you'll notice a difference in taste.


No comments:
Post a Comment