Friday, March 29, 2013

Ninniku Miso-Zuke (Japanese Miso-Cured Garlic)


I'm not sure about you all but I've been absolutely dying the last few days from allergies. DYIN', I tell ya! I haven't had allergies this bad in at least 5+ years. They were so bad that I had to spend all of yesterday in bed sleeping. I felt like I was enduring some version of 50 Shades of Allergy Hell. I'd occasionally get up to slam some Allegra-D and Sinex or snort some Flonase, but nothing was working. I spent my day sucking on hits of  Cepacol Hydra drops like they were all-day suckers and at night...oh, the nights were the  worst! I ended up resorting to taking Nyquil (the dreaded green flavor even) so that I could get some relief from the incessant and unladylike hacking, gacking and occasional phlegm-laced vomiting. I was (am) a total mess.


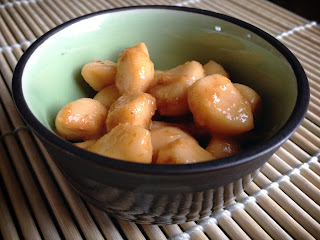
Today's the first real day that I could taste something so I decided to have some rice and ninniku miso-zuke (aka miso-cured garlic). The saltiness of the miso and the tempered bite of the garlic (which is simultaneously sweet and savory) tasted exquisite to my tongue which had been deprived of any flavor the last few days. Ninikku miso-zuke is super easy to make, you just need three basic ingredients: miso, mirin (a sweet rice-wine) and fresh garlic cloves. The hard part is just leaving the batch alone and allowing it to ferment. This summer I might try and be ambitious and try my hand at tofu misozuke, which I've heard people rave about and compare the texture to being like "triple cream blue cheese" or "a cross between butter and foie gras." How delicious does that sound?! I'll keep you posted if I get around to it.


Ninniku Miso-Zuke

Ingredients

handful of  fresh garlic cloves
1 cup miso paste- I prefer to use aka (red) miso, but a sweet shiro (white) or barley miso could be used too
1/4 c mirin
1 clean, dry wide-mouth quart jar

Instructions

1. Separate the garlic cloves. Trim the garlic ends, remove the outer skin and also peel off the thin filmy membrane layer.

2. Blanch garlic cloves for 1-2 minutes in unsalted water. Pull them out and pat dry them with a clean paper towel.

3. In a small bowl mix together your mirin and miso thoroughly.

4. Place a thin layer of miso at the bottom of your jar then make alternating layers of miso and garlic cloves. (Note: You don't want the cloves to touch.) Continue the layering process until you run out of ingredients or reach the top. Finish the top with a miso-mirin mixture layer and make sure all the garlic cloves are covered with miso.

5. Latch your jar and place it in the fridge. Allow it to pickle for at least 1 month. The garlic gets better with age. Keeps good up to 3-4 months.

6. When you're ready to eat the garlic, just pull out the amount you want to eat, rinse off the miso and serve. Use as an accompaniment to a meal or just eat them as a snack. I like to shove a few into the middle of my onigiris or dice it up and mix it with butter when I'm sautéing.

* Tip #1: As you clear each layer of garlic, the miso is still good and can be used in your recipes that call for miso.

* Tip #2: You can buy mirin and aka miso at most Asian speciality stores. For Sacramentans: Otos' Market on Freeport Blvd. carries both.

* Tip #3: Take the time to use fresh garlic in this recipe. The pre-peeled garlic that you can buy in bags at Costco and other grocery stores isn't as fresh and you'll notice a difference in taste.


Tuesday, March 26, 2013

Pickled Easter Egg Radishes


Look at these colorful, little, roly-poly radishes! Cute, no? Well, they're called "Easter Egg Radishes"-- Seriously! That's their real name. These root veggies come in an array of brilliant colors (hot pink, crimson, creamy white and deep purple), are nice and crisp and have a very mild taste. They were just too adorable to pass up at the Co-Op, so I purchased a few and pickled them in a simple vinegar and sugar mixture. They just had to sit overnight and then were ready to be consumed. I've been throwing a few on my crudité platters, pairing them as a side with my sandwiches and even just snacking on them by themselves. They're so good (and much more waistline friendly then a chocolate Easter bunny). By the way, did you know radishes have their own holiday in Oaxaca, Mexico? It's called La Noche de Los Rabanos and is celebrated every year on December 23rd. How cool is that?


Pickled "Easter Egg" Radishes

Ingredients

1/2 cup white balsamic vinegar (champagne vinegar can be substituted)
1/2 cup granulated sugar
1/2 cup water
1 bunch of Easter Egg Radishes
4-5 spring red onions, greens removed and ends trimmed - (optional)

* Be sure to keep the greens from the radishes and the spring red onions, they're edible and delicious!


Instructions

1. Wash and dry radishes. Snip off tops and tails. Quarter or halve them (your choice).

2. In a medium sized saucepan, combine vinegar, sugar and water. Bring it to a nice boil. Stir the mixture frequently until all the sugar dissolves.

3. Remove saucepan from heat and let the mixture cool.

4. Place the cut radishes in a clean jar. I threw in a few spring red onions that I had laying around as well.

5. Pour the mixture over the radishes and onions. Cover with lid and ring.

6. Place in the fridge.

7. You can start eating them the next day. The pickled radishes will keep for 3-4 weeks.

Note: As the radishes sit in the vinegar-sugar mixture, the liquid will turn a vibrant pink/red. That's normal, don't worry.

Tip: If your radishes aren't as crisp as you'd like, drop them in some ice water and pop them in the fridge for about 15 minutes- they'll revive.

Monday, March 25, 2013

Caribbean Breeze Cuisine Restaurant


5015 Stockton Blvd., Sacramento, CA 95820. (916) 538-6818.

Last fall when my dad was visiting we happened to be driving down the Stockton Blvd corridor, when he pointed out a slightly obscured sign advertising a tiny Caribbean restaurant. Caribbean restaurant on Stockton Blvd? Noooo, he must be mistaken! It must be another pho shop. Upon closer inspection though- sure enough, wedged right next to Thrift Town and a neighborhood ice cream parlor, where a tasty soul food eatery used to occupy was a new Caribbean place. Huh. I made a mental note to check it out when I had a chance, but silly me as usual I forgot...until I happened to come across it several months later on Yelp. So on Thursday night, my friend Amanda agreed to go with me on a little food adventure and check the place out. We pulled into the near empty parking lot around 6pm and were greeted by the owner as we stepped up on the curb. He apologized about a soda mishap that they had just had and advised us to watch our step as we crossed the threshold into the dining room. The dining room though small was decorated in a cheery sunshine yellow with booths on one side and a smattering of tables on the other. Although I would describe the decor as casual, effort was definitely made to give it a classier vibe- cloth tablecloths, matching napkins and real glassware. Our server allowed us to choose a table and was over quickly with piping hot, fresh dinner rolls and to take our drink order. In addition to the usual soda lineup, Caribbean Breeze also carries ginger beer, cola champagne, pineapple soda and Vita Malt. I decided to try a beverage called, "Ting," which turned out to be a carbonated grapefruit beverage. It had a nice refreshing taste that was both simultaneously tart and sweet.

I'm not super familiar with Caribbean food (my only real experiences being the dinners my ex-husband and I used to grab at the now-defunct Jamaica House on Broadway) so I decided to play it relatively safe and go with Jerk Chicken. My dining companion, being much more adventurous ordered the goat curry. When our orders arrived, my plate consisted of 3 pieces of chicken, a big scoop of red beans and rice, some fried plantains and a few slices of fresh fruit. I cut into my chicken and found the meat was so soft and juicy that it literally fell off the bone (I didn't really even need to use the knife, I could have just push it off with my fork if I wanted to). Honestly, I loved my dinner- the chicken packed a nice spicy punch but the heat from the seasoning wasn't overwhelming, the plantains added a nice touch of sweetness and the beans and rice were perfectly cooked. Curious about the goat curry I asked Amanda what she thought. Much like my chicken, she said her goat meat was super tender and tasty; however, she found that the dish was slightly on the salty side. My dinner plate was quite filling, which was unfortunate because they had some wonderful sounding desserts on the menu- bread pudding, chocolate cake with a cream cheese filling as well as an almond and cream cheese poundcake. Drool!--Maybe next time. If the desserts taste nearly as good as their entrees though, I'm in trouble!

Prices range from a reasonable $7.95 to $11.95. The menu is fairly short but has a nice array of choices such as Caribbean style chicken curry, oxtail stew, grilled red snapper Jamaican patties and escoveitch fish. Entrees come with a small garden salad to start. The service we experienced was friendly although slightly awkward; however, we did find out that our server was new and was learning the ropes, which may have explained her quiet, tentative behavior. (I'm sure she'll be fine once she finds her footing.) Regardless, the owner more than made up for her shyness with his friendly exuberance and big smile. Overall, my visit to Caribbean Breeze Cuisine Restaurant was delightful. My only suggestion- it was a bit warm in the restaurant, they should maybe get some sort of airflow going via fan or AC too cool the dining room down; otherwise- hospitable, flavorful and affordable...what a fantastic addition to Sacramento's ethnic cuisine scene! I can't wait to go back. I hope you too support this small local eatery by taking the initiative to leave your suburban casa or your crib in the Grid and head over to Stockton Blvd for some homemade Caribbean comfort food-- you won't be disappointed!

Sunday, March 24, 2013

Sacramento, Where Are Your Manners?


Last year, Travel + Leisure magazine declared that New York City took the prize in it's America's Rudest Cities poll and I'm sure most people weren't surprised. I know I wasn't- pushy commuters, harried business folk and cramped quarters aren't exactly the ingredients that foster a friendly community in my opinion. On the other hand, I've always felt that my hometown, Sacramento is a pretty personable town- random people smile and say, "Hello," to you as they walk by on the street, it's pretty easy to make friends here and neighbors are always down for helping you out. But lately, when I'm in restaurants or stores I've felt that Sacramento has sorely begun to lack in manners. Some of my big pet peeves lately have been people who answer their phones in upscale restaurants and proceed to have lengthy (and loud) conversations while disturbing those seated around them, drivers who refuse to let you merge even though you have your blinker on and your lane is clearly ending and patrons that think it's acceptable to be snotty, loud or just plain asshole-y to customer service personnel (i.e. cashiers, waiters, the mailman). Not to mention- what ever happened to simply saying, "Please," and "Thank you"?

Today for example, I was in a great mood as I headed over to Taylor's Market to pick up some filet mignons to BBQ at Mr.S.'s. As I drove down Freeport Blvd., this silver SUV rode my bumper the entire length of the drive from Broadway to Taylor's parking lot. It was annoying, but I got over it. The car pulled into the lot after me, a mother and adult daughter exited from the vehicle and followed me into the store. Now count it- not one or two but- THREE times while I was in the store, instead of walking around/behind me, they chose to push their way through and walk in front of me as I looked at grocery items. No "Excuse me," or "Pardon Me's" either as they squeezed their asses between me and the meat counter as I ordered. When it was time to check out, lucky me- I ended up at the checkstand at the same time as them. Now if you've ever been to Taylor's, you know that their store is pretty cramped. These two women decide to just stand there and block the checkstands while jabbering so that no one could get around them. Like two bumps on a log they just jammed everything up, until a clerk directed them to a open cashier. Really is it that hard to just pick a line and get in it folks?! The final topper was that I ended up behind these two idiots as I existed the store and as they passed through the door the older of the two women (the mom, perhaps?) just lets the door go after she passes through so that it almost hits me (who's walking just a few inches behind her)...it narrowly missed smacking me in the nose. Ugh...but that's not the worst of it. The worst of it is that this behavior is becoming commonplace and I see it often. When did having good manners become the exception instead of the norm? It doesn't cost anything to be polite, so please take a minute and think of how you interact with those around you...and let's all try and bring politeness back and spread some kindness. If you're not sure how, think back to the Golden Rule from kindergarten - "Do unto others as you would have others do unto you." It's an oldie, but a goodie.

Wednesday, March 20, 2013

Les Radis Petit Déjeuner : French Breakfast Radishes


Recently, I've noticed I've been pulling out my "fat" jeans more and more from the closet. Upon some self-reflection, I realized that I've put on some weight from the winter holidays, stress eating and Girl Scout cookie season. The dreaded trifecta. Ugh! Anyhow, rather than ignoring the problem and opting to stock my wardrobe with more comfy yoga pants with expandable waists, I decided I'm going to lose a few pounds. Now you can imagine there's no dirtier four-letter word to a food lover like myself than "diet." I hate limiting myself as to what I can and can't eat. This time, however, I decided to be a bit realistic- so I'm cutting out soda, junk food and my incessant snacking but I'm going to allow myself some small indulgences. Like these French Breakfast radishes I made for lunch yesterday. I used a wee bit of butter but on the whole they're pretty healthy. Radishes are one of the most nutritious root vegetables. They're low in calories, rich in Vitamin C and they are also a good source of anti-oxidants, electrolytes, minerals, sulphoraphane and dietary fiber. Now French Breakfast radishes are much less spicy/peppery than other varieties so they're great for eating raw or sautéing...to be honest, I'm not sure why they're called "breakfast radishes" as they're not specifically known for being eaten at breakfast in France or anywhere else. They're easy to spot though. They're on the smaller side, shaped a bit like a slender finger; the tops of these dainty radishes are usually a pretty fuchsia-pink color which eventually fades into white towards the tips. Anyhow, sautéed in a tiny bit of butter, olive oil and garlic- these delicate radishes along with their leafy greens are delicious! A perfect afternoon lunch or dinner side dish.

By the way, a word of advice- never, ever tell your significant other you're dieting. This is what will inevitably happen:


Sautéed French Breakfast Radishes

Ingredients

1 bunch French Breakfast radishes, with greens attached

1 tablespoon unsalted butter

1 tablespoon extra-virgin olive oil

1-2 cloves of fresh garlic, minced

sea salt and fresh ground pepper, to taste


Instructions

1. Wash and dry your radishes. Remove the greens. Quarter the radishes. You can tear the greens into bite-sized pieces if you wish.


2. Heat the butter and oil in a skillet over medium-high heat. Add the radishes and sauté until they become crisp-tender and slightly translucent. Add the garlic. Cook until fragrant. Add the greens. Cook until they become soft.

3. Remove from heat. Season with sea salt and fresh ground pepper. Serve warm.


Tuesday, March 19, 2013

Keepin' It Simple: Radish Tartines


Mmm, spring is in the air! Everything's blooming (I'm sure Allegra sales have sky-rocketed this week), the birds are out chirping and Sacramentans are dusting off their gardening tools and getting to work on their spring gardens. Look at these beauties that have opened their sleepy little heads around my cottage....


What better way to welcome the first day of spring (which comes early this year- March 20), then to put together a crisp, vibrant lunch of radish tartines? One of the reasons I love radishes so much is that they're so easy to work with, you don't have to dress them up much to make them into a fab meal. Check out these cute, peppery gems I found this weekend. They're almost too pretty to eat...almost. Now the trick with this dish is to pick a mild type of radish and don't skimp on the quality of the butter.

Side note: Don't throw away your radish greens, people! They're edible- save them for dinner and sauté them up with some onions, garlic and olive oil or throw them into a soup, the same way you would chard or spinach.


Radish Tartines

Ingredients

French baguette, sliced

Fresh radishes, washed, dried and ends removed

European-style butter (like Plugrá), unsalted, room-temperature

Fleur de sel or a good-quality sea salt


Instructions

Now I know you all know how to make an open-faced sandwich, but just for kicks:

1. First start with your bread, you can go toasted or untoasted- it's up to you. I prefer lightly toasted.

2. Lavishly slather the softened butter onto your baguette slice. Forget about that bikini you're hoping to fit into in June, treat yourself and get a nice big decadent swipe o' butter on there.

3. Sprinkle on a bit of fleur de sel.

4. Then gently lay a few slices of radish on top.

5. Find a sunny spot to eat. Plop down and relish those fresh radishes. You can even greet passing neighbors in French, if you're feeling sassy and really want to get into it.

Tip: These also make great appetizers for a party. For some variety you can sub goat cheese for the butter and garnish the radishes with minced chives.

Monday, March 18, 2013

A Perfect Day For Banana Bread


Happy (belated) St. Paddy's Day everyone!


I hope you enjoyed the sunny weekend and indulged in some corned beef, tipped back some good Irish whiskey and perhaps found some luck of the Irish. I took advantage of the beautiful weather and hit up the Sunday's farmers' market for fresh spring fruits and veggies and then lounged around on the back patio of one of favorite coffee shops, soaking in some Vitamin D while completely absorbed in my latest read, Nancy Singleton Hachisu's, "Japanese Farm Food." If you haven't checked out this book yet, please do so. Hachisu is a California Bay Area native who moved to Japan, married an Japanese egg farmer and raised a family in a charming 85-year old farmhouse in Kamikawa in the rural Saitama Prefecture. Part cookbook, part memoir, her book is a wonderful example of true farm-to-table cooking and her traditional recipes are simple to follow. The photographs are stunning and the detailed narration makes you feel like you're right there- whether it be in the midst of her garden, scrubbing root vegetables at her kitchen sink or just talking with the quirky fishmonger at the local market. I can't wait to attempt one of her recipes! In the meantime...


Post-caffeination, I strolled back to my car and noticed this cool old wall mural. I must have passed by this building in Curtis Park a million times over the years but never took notice. I'm sure there's more of these charming bits of artwork squirreled away around town, which one's your favorite?


After I got home, I had the urge to open all the windows in the cottage, get some fresh air circulating and bake something...possibly some sweet, moist, spongy banana bread? Yup. Now I've always been loyal to the banana bread recipe I discovered in my well worn copy of "The Joy of Cooking," long ago; but earlier this month, I came across a tiny recipe at the bottom of a page in my issue of Bon Appetit. The recipe was called, "Julia's Best Banana Bread," and originated from a small roadside stand in Kahakuloa, Maui. Intrigued, I decided, "Why the heck not?" and clipped it. Well yesterday I decided to give it a whirl. I'm glad I did, the resulting product was delicious...a loaf of warm perfection. So perfect, in fact, that I'm making more today.


Julia's Best Banana Bread (Bon Appetit, March 2013)

Ingredients

Nonstick vegetable oil spray

1 3/4 cup AP flour

1 1/2 teaspoons baking soda

3/4 teaspoon kosher salt

3 large eggs

1 1/2 cups sugar

2 large ripe bananas, mashed

3/4 cup vegetable oil


Instructions


1. Preheat oven to 350°. Coat a 9x5x3-inch loaf pan with nonstick spray.

2. Whisk flour, baking soda, and salt in a medium bowl. Whisk eggs, sugar, bananas, and oil in a large bowl until smooth. Add dry ingredients to banana mixture and stir just until combined. Scrape batter into prepared pan and smooth top.

3. Bake until a knife inserted into the center of bread comes out clean, 60-70 minutes. Transfer to a wire rack; let bread cool in pan for 15 minutes. Run a knife around inside of pan to release the bread. Turn out onto rack and let cool completely.

Monday, March 11, 2013

Springtime Roasted Baby Beet Salad With Kumquat Vinaigrette


Springtime in Sacramento is absolutely gorgeous. All the cherry blossom trees in my neighborhood are in full bloom right now, the daffodils are out and ready to play, and kumquats are in season. Now Mr.S. hates kumquats but I, on the other hand, find them to be cute and delicious. If you're unsure of what a kumquat is - they kind of look like an orange but they're about the size of a large oblong grape. They have a wonderful citrusy smell and the whole thing is edible (minus the seeds). When you bite in, you'll find that the rind is soft and sweet and the flesh has a tart punchiness that might make you pucker for a second. They're quite versatile too- last year I candied a bunch, baked them in cakes and muddled them in my cocktails but this year I've been mostly snacking on them raw or slicing them into thin rounds and mixing them with my salad greens. Today I ran out of salad greens so I decided to roast up some baby beets that I had in the fridge and dress them with a light kumquat vinaigrette. Can you say, "Freakin' YUM!"? If you could bottle up some of our current beautiful spring weather, I'm sure it'd taste a lot like this vinaigrette- bright and peppy!

Springtime Roasted Baby Beet Salad with Kumquat Vinaigrette
makes 1 serving

Ingredients

1 dozen baby beets

2 tablespoons kumquat juice (approximately 10-12 kumquats)

3.5 tablespoons extra-virgin olive oil

1 tablespoon orange champagne vinegar (regular champagne vinegar or white balsamic vinegar works fine too)

1/2 teaspoon honey

1 garlic clove, minced

sea salt and fresh ground pepper, to taste (optional)


Instructions

1. Preheat oven to 400 degrees F.

2. Wash the baby beets, remove tops (tip: save them and sauté them for dinner). Dry thoroughly with a paper towel. Toss with 1.5 tablespoons of olive oil. Wrap in aluminum foil. Place in oven and roast for 30-35 minutes until beets are tender.

3. Remove beets from oven. Open aluminum packet, allow to cool for 15-20 minutes. Once cooled, remove beets from foil. Using a paper towel, "slip" the beet skins off.

4. In a small bowel, whisk together kumquat juice, 2 tablespoons olive oil, orange champagne vinegar, honey and garlic. Season to taste with sea salt and fresh ground pepper.

5. Drizzle vinaigrette over beets and toss.

6. Serve immediately.

Friday, March 8, 2013

Spicy Thai Soup


If you've been over to my cottage lately, you'll notice my coffee table, dining table and nightstand are piled high with books. Books, books, books everywhere. I love books. I always have, even as a kid I would get ecstatic when the school sent us home with those book order sheets from Scholastic (remember those?). I'm sure my parents used to cringe when they saw those- I was a quick reader and I always wanted a ton of books. Even now as an adult, I love to order books online, peruse the stacks at the library and most of all linger in bookstores. There's something about print media that engages me, that digital media just lacks. I'm not sure if it's the tactile sensation of holding the book or the musty smell of the pages but there's a biblio-euphoria that comes with reading books for me. And currently, I'm a bit inundated. I've got books I need to read for book club, books I've been needing to read for a few months now on specific subjects (like "Slaying Excel Dragons"- Ugh!) and my favorite category- food books. The majority of the books in my home right now are cookbooks, culinary essays and food memoirs. Are you surprised? ;)
The five food books on my nightstand right now that I'm steadily making my way through are:
1. Recipes Remembered: A Celebration of Survival by June Feiss Hersh - if you read this one, keep a box of tissues close by!
2. My Berlin Kitchen by Luisa Weiss
3. My Year of Meats by Ruth I. Ozeki
4. The Saucier's Apprentice by Bob Spitz
5. Encore Provence by Peter Mayle


Photo Source: ParisForBreakfast


What's on your reading list? Any good food stories or cookbooks you'd recommend? I'd love to hear your suggestions.
My top three favorite food books of all time that I'd recommend are:
1. Kitchen Confidential  by Anthony Bourdain. Although Bourdain has watered himself down over the years this memoir is still one of my favorites, a pre-commercialized Bourdain if you will. It also reminds me of the days when I worked in the restaurant industry- being in the weeds and all stressed out, putting up with insane customers and of course coming to work hungover after partying with coworker all night.
2. Any of Ruth Reichl's first three books (Tender to the Bone, Comfort Me With Apples or Garlic and Sapphires). All brilliantly written. Reichl has a writing style that just reaches you out and brings you into her warm kitchen and eclectic world.
3. The Sharper the Knife, The Less You Cry by Kathleen Flinn. A great story about starting over. Could you just pack up and move to Paris and pursue a diploma from the world famous Le Cordon Bleu? Flinn did and shares her frustrations, joys and tribulations. She also does a fantastic job of painting images of the French farmers' markets and storekeepers she encounters. I found this a much better read then the popular "Julie and Julia," which had me snoozing in some chapters.
Now you didn't think I'd leave you hanging without a recipe, did you? How about a recipe for a nice bowl of hot soup? I made this spicy Thai soup the other night and it hit the spot. It's richly flavored without being overly heavy and it's simple to throw together (giving you more time to snuggle down and read a book). And if you want to make the dish a bit heartier, you can throw in some boneless cubed chicken meat or serve it over rice.

Spicy Thai Soup

Ingredients

2 (14 oz) cans lite coconut milk
1 (14 oz) can chicken stock
4 stalks fresh lemongrass (bottom 2/3rds only, remove tough outer leaves)
9 slices of peeled ginger (cut in 1/4 inch thick round)
4 kaffir leaves, hand torn
3 birds-eye chilies, lightly pounded and sliced
2 tablespoons fish sauce
4 tablespoons fresh-squeezed lime juice
2 teaspoons sliced cilantro
2 teaspoons red curry paste
2 tablespoons light brown sugar
5 cloves garlic, minced
1 tablespoon soy sauce
1 (14 oz) can artichoke hearts (drained and rinsed)
1 (14 oz) can baby corn (drained and rinsed), sliced in half
3.5 ounces fresh shimeji mushrooms
1 large carrot, peeled and julienned


Instructions
1. Cut off the hard, dry bottom portion of the lemongrass and the top leaves. Bruise the stem by thwacking it with a heavy knife or meat mallet. Peel off the tough outer leaves. Cut into 1-inch long pieces.
2. In a stock pot over medium heat, add coconut milk, stock, sliced ginger, torn kaffir leaves, sliced chilies and lemongrass. Bring to a boil for 1 minute. Stirring occasionally.
3. Reduce to a simmer. Let it cook for about 5 minutes.
4. Add fish sauce, lime juice, sliced cilantro, red curry paste, brown sugar, garlic and soy sauce. Again bring to a boil for 1 minute then return to a simmer.
5. Add rinsed artichoke hearts, baby corn, fresh shimeji mushrooms and julienned carrots. Simmer for about 15 minutes. The vegetables will become tender.
6. Remove kaffir leaves, ginger rounds and lemongrass stalks.
7. Ladle into warm bowls. You can garnish the top with roughly chopped fresh basil or cilantro leaves (optional).

Wednesday, March 6, 2013

"Crystal" Rock Lemon Candy


People say it's difficult to be a mother but in my opinion it's just as hard to date someone with kids. It's a category with no clear definition- just fuzzy borders that you bump into as you stumble about in an unfamiliar world. Oftentimes your partner sends mixed signals- there's times he/she wants your input and wants you to be super-active in the children's lives and other times it's clear you're the outsider. In our case- Mr.S., the bio mom, the grandparents, aunt and uncle all have assigned roles; whereas, me...well, it depends on the day and situation. You want to be there for the kids, connect with them emotionally, provide them with structure and support and most importantly- love them; but at the end of the day, they're not your kids and you don't have the final say in how they're raised (and their parent's values, beliefs and standards may be different then your own). The situation gets even more awkward when the kids make comments like, "I wish you were my mom." It tugs at your heartstrings and you don't know how to respond. There's no handbook and most people you know aren't in the same situation and can't offer advice. Its almost like you need to keep a certain amount of distance to protect your heart...not to get too attached, but it's hard not to when you spend so much time with them- playing, talking, and teaching.

Over the past three and half years, Mr.S. and I have found a balance with his kidlets. I'm not saying dating someone with kids doesn't pose a slew of challenges but it can also be incredibly rewarding. I'm pretty involved with his kidlets these days and have developed a close relationship with his elder son. I think both of his kids know I won't indulge them or let them get away with BS but I'm also stable and there for them when they need me. Additionally, they also know I mean what I say and I always follow through on my promises and I think that holds a lot of weight with them. Also, I have had to learn to be more flexible which has been quite hard and I'll admit there are days when things aren't easy and I'm pulling my hair out. Those are the times I'm grateful that I have the option to duck out of Mr.S.'s house and seek refuge at my cottage; those moments though are becoming fewer and fewer as the kidlets and I spend more time together. It's been quite the learning curve for sure!

One of the more simpler things I love about his kidlets is that they're usually curious and open to trying whatever I'm concocting in the kitchen. Sometimes Kidlet #2 will help me by peeling and chopping veggies or rolling dough. Whereas, Kidlet #1 is always happy to be my taste tester. Recently, Kidlet #1 needed to make rock candy for a school project. I was tickled pink that he asked me to help him. We made two batches, one in yellow and the other in blue. We also added a subtle lemon flavor. Kidlet #1 ended up taking the blue one in for his grade (which looked a bit like the Blue Crystal meth from Breaking Bad...LOL) and got 100% on his project. How outstanding is that?! I was so proud of him.

I guess only time will tell how my relationship with the kidlets will evolve. On days that I get discouraged or frustrated, I remind myself of this quote that I came across on a billboard once- "What a child doesn't receive, he can seldom later give," then I take a deep, deep breath and try and go back in with a healthy attitude and some patience.


"Crystal" Rock Candy

Ingredients

4.5 cups + 1 tablespoon granulated white sugar

2 cups of water

food coloring

1 teaspoon lemon extract (not lemon juice)

1 wooden skewer

1 (quart size) clean, dry glass jar with ring

1 sheet of paper towel


Instructions

1. Wet top half of wooden skewer. Sprinkle one tablespoon of sugar on a plate. Roll your skewer around on the sugar so that it sticks. Set the skewer aside and allow it to dry completely.

2. Bring 2 cups of water to a boil in a medium saucepan. Add 1 cup of sugar at a time, stirring constantly and allowing the sugar to fully dissolve. Continue until all 4.5 cups have been added. The mixture will look clear with a wee bit of hint of cloudiness.

3. Let the sugar water boil for 10 minutes. Then turn the heat off.

4. Take the saucepan off the burner. Add food coloring and lemon extract.

5. Allow the mixture to cool for about 15-20 minutes and then pour it into your clean, dry glass jar. (Use a funnel, the mixture is pretty sticky and you don't want to get it all over your kitchen counter.)

6. Place the sugar-coated skewer into the middle of the jar. Slide the paper towel over the top of the skewer and then secure with the ring. (We started with Press and Seal but we quickly switched over to a paper towel as we found the paper towel served a dual purpose- it held the skewer in place but it also absorbed some of the condensation from the mixture.)


7. Place the mixture someplace where it won't be disturbed. Leave it alone for 5-7 days and Voila!-- you've got "Crystal" Rock Candy!

Note: If after a day or two you don't see any crystals forming, you may need to add more sugar. Just pour the mixture back in a pot, bring it to a nice simmer and add another 1/2 to 1 cup of sugar. Repeat the process with the skewer and jar.

 
Fashion Trend © 2011 | All Rights Reserved | About | Privacy Policy | Contact | Sitemap